Bkgd

Showing posts with label cricut. Show all posts

Tuesday, March 26, 2013

PTT #113 - Anything Goes

Hi Friends!

Welcome back to Stella, Roo and Fena Too Designs!  We have the best challenge for you today at
Party Time Tuesdays - Anything Goes!  So you can create anything and come share with us for a chance to wins some great prizes from our wonderful sponsors!

Our fun sponsors:


I know you are probably expecting something with flowers for spring, but nope, not on this post!  As I write this post we are getting lots of snow.  They are calling for 5-9 inches of that white stuff.  We are at the end of March and still getting snow.  I hope it clears up by Easter!  So I have used a Sassy Cheryl's digi snowman image printed on cryogen paper.  The snowflakes around the image were done with the emboss resist technique, the  outside was inked with tim holtz distress ink.  The sentiment is embossed with silver powder and is by Stampin Up.


Copics used:
Boots: C3, C5, C7, C9
Jacket:  BG0000, BG72, BG75, BG78
Scarf:  BV20, BV25, BV29, C1, C3
Snowman:  B0000, 0
Carrot:  YR65, YR68


The inside sentiment is by Stampers Anonymous.

Ok, it is your turn.  Come and share your current project with us at the Party Time Tuesdays Anything Goes Challenge!  I can't wait to see what you share with us!


I would like to enter this in the following challenges:
Avenue 613 - Anything Goes
Challenges 4 Everybody - Anything Goes
Christmas Stampin - Anything Goes

Thanks for stopping by today!

Blessings until next time....
Athina

Wednesday, December 5, 2012

Crafty Gals December Challenge

Good Morning Friends,

We are half way thru the week and today I have for you the final Crafty Gals Challenge of the year.

Guess Who I'm CASEing?! 

Go back to the month of March on one of the Crafty Gals blogs. It doesn't matter whom you choose. That is totally up to you. That's the fun of us guessing right?!
Find a project from the month of March on their blog and CASE it.


Ok, so I searched and found the card that I wanted to CASE.  I hope I did it right!  I used basic grey paper as the background and a Whipper Snapper image colored with copics.  I stitched around the edges of the card and the image.  I finished it off with a snowflake cut out from the cricut and a sentiment by Printworks.


Copics used:
Hat & Coat:  R24, R27, R29, E30, E31, E33
Scarf:  YG93, YG95, YG97, 0, E31, E35, E37
Bell:  Y21, Y28, W5
Carrot:  YR20, YR24, YR27
Shoes:  E31, E35, E37
Twigs:  E21, E25, E27
Snowman:  W0, W1, W3


The inside sentiment does not have a maker on it.


Make sure to stop by and visit the other ladies to see if you can figure out who I cased!


Melina ~ Crafty Scrapper
Tracie ~ The Crafty Touch 
Carolina ~ Cardolina Scrapolina

Jackie ~ Kreate With Me 2

What a great challenge to end the year with!  
Thank you for stopping by today!  
Blessings until next time....
Athina

Thursday, November 15, 2012

Silent Night!

Hello Blogging Friends,

I have been playing with my Magnolia's a lot lately.  They are some of my favorites for Christmas stamps.  I have had the Silent Night Tilda stamp for a few years but have never colored her.  I think the flowers were a bit intimidating to me.  So I finally decided to ink her up and put some color to her.  The sketch is by Totally Tilda, so I will be entering it into that challenge.  The paper is by MME Christmas Collection and I distressed the edges of it.  The image is stamped on cryogen paper and cut out with a spellbinders die.  I gave the edges some distress ink.  The snowflake was cut out with a cricut cartridge and I added some glitter and liquid appliqué to add some dimension to the snowflake.  I finished it off with a few buttons and some twine.


Copics used:
Hair:  E50, E31, E25
Skin:  E000, E00, E13, E11, R20
Coat:  YG93, YG95, YG97, W5
Dress/Socks:  E08, E13, E19
Shoes:  E31, E33, E35, E37
Pole:  E21, E25, E29
Flowers:  R24, R27, R89, G24, G94, G99
Ribbon/Bow:  0, W1, W5


Inside papers are by MME and match the front.  The die is a spellbinders die cut and the sentiment is one of my favorites by Brother Sister Design Studio.

I would like to enter this in the following challenges:

Thanks so much for stopping by!  Your kind comments are greatly appreciated.

Blessings until next time.
Athina


Monday, November 5, 2012

Crafty Gals November Challenge

Happy Monday Blogging Friends!

Today I have the monthly post for the Crafty Gals Challenge over at SCS.   This month's hostess was Jackie.  So here is the challenge:

"Fall Blessings"
November is for Thanksgiving & we all have so many things to be thankful for so my challenge for you this month is to create a project to showcase our Blessings. It can be a card, shadowbox, picture frame, scrabook layout, mini album, etc. Please make whatever your heart desires as long as it features what you are thankful for & I also want you to use a Fall theme for your creations. I can't wait to see all of your wonderful works of art! Have Fun & Happy Stamping!!!!


When I first read the challenge, I thought very easy!  I will update some of my old window frames with current pictures.  But when I re-read the challenge, it needed to be a fall theme.  Well that would not work, so back to the think tank.  I have a few old pictures that are not my style any longer.  So I took this one below and began to get messy!  I honestly had a blast with this challenge!


I turned the frame and picture above into this below:


Big difference right?  Well, I used some sanding paper, acrylic paint, vaseline, tim holtz distress stains and went to work on the frame.  I will post more pictures tomorrow to show you exactly how I transformed the frame.  For the inside, I used the Jasmine cricut cartridge to cut out the word "family".  I covered the background in MME paper and adhered the cutout to the background.  After that, I added some ribbon and lace to give it more of a country feel.  

I added part of a doily with a clock and pearl to the top left .

Remember that burlap from the wedding a few weeks ago, well here it is in use again.  I added it with some leaves, a sunflower and a heart key to the bottom right hand side.


Please stop by and find out what blessings the other great ladies have created.


I want to thank Jackie for such a fun challenge.  I hope you enjoyed your visit today.  Don't forget to stop back by tomorrow when I will show you some more pictures and step by step directions on how to turn that ugly frame into a fun frame.

I would like to enter this in the following challenges:


Crazy 4 Challenges  - Anything but a Card
Raise the Bar - Anything Goes
Forever Friends  - Anything Goes
Rubys Rainbow - Use a Doily
LEJ Designs - Anything Goes
http://partytimetuesdays.blogspot.comParty TimeTuesdays - Anything Goes


Thanks for stopping by.  
Blessings until next time...
Athina

Thursday, June 28, 2012

Happy Birthday Chaitali!!

Hello!

Today I want to wish my friend Chaitali a very HAPPY BIRTHDAY!  I sent this card to her and I hope she has received it by now.  

I got my inspiration in church from the VBS group. The invites were pencils with pinwheels on top.  Very fun and summery!  

Recipe:
Paper:  MME & Echo Park
Sentiment: Outside:  Stampin up, Inside:  American Art Stamps
Sketch:  Lets Scrap 5-1-11

So how did I make that pinwheel?  It was very simple.  I cut a 3 inch square out of double sided paper.  and folded the square in half to make a triangle going both directions.  So you have folds with 4 triangles.  I then cut most of the way up on every other fold.  Fold one side to make it look like a pinwheel.  After I did the folds, I put a cute little brad in the middle.


Chaitali's blog is on the left side.  Stop by and give her some birthday wishes!

Have a great day Chaitali!

Thank you for stopping by...
Athina

Thursday, June 21, 2012

Kissing Cousins!

Hello Friends!

Just a quick post tonight!  I have not had a lot of time to get work done in my craft room.  This is a page out of the book I made for my dad for Father's Day.  I took the pictures at my brothers wedding last October.  The two little girls are my nieces.  While we were taking picture of the brides and her bridesmaids, I zoomed in a bit and snapped a few of them sharing sweet kisses.

The background paper is by inque and the others are by MME.  For embellishments, I used a clear stamp to stamp the flourish, some white chipboard inked with Tim Holtz Peeled Paint Distress ink and finally a few butterflies cut out of my Storybook Cricut cartridge.  I used a layout by Audrey Yeager from Creative Keepsakes Mar/Apr 2012 as inspiration for this page.


I cut two of each butterfly and used a random stamp on each to emboss clear powder on them.  After I embossed them, I used Dusty Concord and Peeled Paint Distress ink on top of them.  The embossing powder created a resist to the ink.  I finished them of with some pop dots between the two layers and some pretty pearls.

I hope to be back with some cute cards very soon!  

Thank you for stopping by!
Blessings until next time...
Athina

Tuesday, June 12, 2012

Picture sorting for all those scrapbookers!

Good Evening Friends!

It has been a very busy few days cutting down trees and getting some things organized for the next few weekends!  But I did get some time to play in my craft room a little bit on Sunday.  We have a challenge over at our Pink Slipper Pajama Party blog group each month.  These ladies are so talented and I am pleased to be a part of their group!  

So Nancy is our June hostess.  Here challenge:

June’s challenge is to make some type of mini album/book.This does not have to be a scrapbook album. It can be a personal journal,calendar, inspiration book, diary, address book, coupon holder, an organizer.


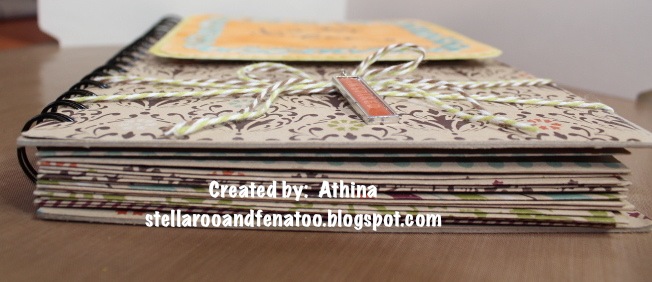
Well, this is right up my alley.  I love making altered books and things.  This is a 10" x 6.5" organizer made out of chipboard and printed craft paper.  The paper all coordinates, as I bought it in a pack together a few years ago.  I simply cut the chipboard cover to the size I wanted.  Then I used mod podge and glued the design paper on the top of the chipboard.   I then sanded the edges with my sanding block.

For the label on the front, I used the Cricut and cut out the label from the Lacy Labels cartridge.  It began as all white.  That is much easier than trying to match everything.  I then used my copics and my air compressor to color it how I wanted it.  I finished it off with some rub ons.  I added some dimension to the label by using dimensional glue dots.

I tied some jute twine around the bottom and used a charm that says "inspired".
Front


Edge

For the inside, I used a large rounded square cut from a cricut cartridge.  After I cut them out, I folded them like an envelope.  I did not fold over the top, as I wanted it to remain open.

Inside standing up

I used my bind it all to bind the book together.  I will use it to sort pictures for my scrapbooking when I travel.  That way I don't have to take a huge case of pictures, I can take only what I want.  I can also put in other mementos that go with the pictures.
Inside of book (outside of envelopes)

I did not decorate the inside envelopes, as I wanted them to remain flat for ease in packing for travel.
Envelopes open for pictures

I hope you enjoyed this little project.  I had fun making it and it was super simple.  Try one for yourself!  You can put all sorts of things in those envelopes!

Thank you for stopping by!
Blessings until next time....
Athina

Sunday, March 25, 2012

Jingle-balls!

Hello!

A few days ago we were up in the 80's.  For March that is very unusual, so I thought we needed something to cool us down.  Well it has worked, the high for today is around 55.  We are having some crazy March weather around us.  But very thankful for the warmer days that we can get outside and enjoy some sunshine.

I used the distressing technique on this card to give it an older feel.  All DP is by MME.  The snowflake was cut out on the cricut and then I used liquid applique and heated it with a heat gun.  After it puffed up, I airbrushed it with blue copics to match the card.  The white stood out entirely too much on a distressed card.  The image is by Whipper Snapper (Jingle-balls).  Isn't the little guys teeth on the right adorable?  Love it!  After coloring the cute little guys with copics, I went back and used flowersoft mixed with glitter for snow underneath them and on the hat of the right snowguy.


Copics used

I would like to enter this in the following challenges
Christmas Stampin - Anything goes
The Poodles Parlour - Anything Goes
Stampin Fort the Weekend - Anything Goes
Create Me Pink - Tear it up
Cute Card Thursday - Anything Goes
Divas by Design - Distress it
Whimsy Inspires - Anything Goes


Thanks for stopping by today!

Have a fantastic week!
Until next time.
Athina