Bkgd

Showing posts with label birthday. Show all posts

Sunday, January 13, 2013

Loves Rubber Stamps - Sensational Sunday Inspiration 1/13

Hello and Happy Sunday to you!

I hope you are getting some relaxing time today whether it be spending time with your family, watching football or crafting while the others watch football!  I am in my room working on some fun stuff for you in the upcoming weeks!  I love Sundays, a day to relax and rest. Ahhh..

I am back today with a Sensational Sunday Inspiration for Loves Rubberstamps today.  I really need to stock up on my birthday card stash so I am not up late at night getting something together the night before someone's birthday.  So I decided I would use this cute cow image, C.C. Designs Moo-valous, and start with my card.  It is stamped on cryogen paper in memento ink.  I colored this cutie with copics.  I decided the background of the image needed to have some fun confetti around it, so I dotted the background with different colored copics and finished the edges with spun sugar distress ink.  The image is matted on black cardstock.  I used the Echo Park  This N That collection of papers.  The circle is cut with the Spellbinders Large Oval die and embellished with a flower and some extra pearls.  The scallops were done with a fiskars scallop punch.


Copics used: 
BG11, BG13, BG49, E31, E37E50, E53, E55, E57, R20, R22

The inside of the card uses the left over scraps from the front of the card.  The circle is cut out with the Spellbinders Large Oval die and sentiment, by Stampabilities, is stamped with memento ink.

After I finished my card, I looked at it and realized that I did not use any ribbon.  I think I have used ribbon or trim on every card for some time now.  Maybe I am starting to change... ummm, maybe not. 

Stop over and play along with our challenge to use Die Cuts or Punches!

Remember... EVERY SUNDAY... you will have the chance to win a gift voucher to the Loves Rubberstamps Store.... just for leaving a comment on the post at the Loves Rubberstamps Inspiration blog! Winner will be chose with random.org and will be announced on the following Sunday's post!

To try and win a $5.00 Gift Voucher - Just leave a Comment on the post 
at the Loves Rubberstamps Inspiration blog - that's it - nothing else!!

To try and win a $10.00 Gift Voucher - (we will check these)
                                       1. Be a FOLLOWER of the  
Loves Rubberstamps Blog
                                       2. Be a FOLLOWER of The Loves Rubberstamps Challenge Blog
                                       3. Be our fan on Facebook
                                       4. Add our Blog Candy Badge to your blog 
                                       5. Leave a Comment on this post to show love to the DT 

I would like to enter this in the following challenges:

Thank you for stopping by.  Your kinds comments are always appreciated.
Blessings until next time...
Athina

Sunday, July 8, 2012

For a Special Lady!

Hello Friends!

Today is a special day!  My Aunt is celebrating her birthday.  I can tell you in the last 10 years we have become very close and I am very grateful for our relationship.  I guess I can blame her for this crazy addiction I have.  I remember telling her when she asked me to scrapbook with her, "I am not that patient, I don't think I could do it."  Well, here we sit today and she blames me for getting her into trouble with supplies and You Tube.  I guess what comes around goes around, right?! =-)

Well, we both have a love for the same man... Ummm, that would be Tim Holtz.  So I thought I would take some of the things I am learning in the Creative Chemistry 101 class and make a card for her.  She will 'get it'!.  Others would likely say, what did you do with that mess of stuff.

So for the tag, I used distress inks in blues and greens.  I then used some stamps with white picket fence stain and stamped on top of the first layer of distress ink.  I heated it with a heat tool to make sure it was sealed.  Then I used black Archival ink to stamp the bird and flowers (stamps by Tim Holtz Visual Artistry collection).  I also stamped a bit of texture in black to add some extra dimension.  When I completed the stamping, I used black soot distress ink to go around the images to make the center pop out a bit more.  The ribbon on the top was white, but I used tumbled glass distress stain to give it color to match the tag.

The background is actually a black piece of cardstock.  I took crackle paint in white and painted the cardstock.  I was too impatient to let it dry, so I heated it also.  Once it cracked, I went over it with peeled paint and tumbled glass distress ink for additional color.  Don't be shocked, but I then wadded that piece of black cardstock up and then flattened it out and distressed the edges.  I figured that since the tag was a bit grungy, I would make the background grungy as well.


The inside was much simpler.  Just a piece of Bo Bunny paper that matches the outside.  I distressed it then took a white piece of cardstock to stamp the sentiment.  The edges of the white cardstock are inked with more peeled paint and tumbled glass distress ink.


When I finished, my hands were pretty stained.  But overall, I am very happy with the result.  I can't wait to play a bit more with the inks and stains.  They are pretty cool!

Have a great day!
Blessings until next time...
Athina

Friday, July 6, 2012

Water Color with Distress Markers

Hello!

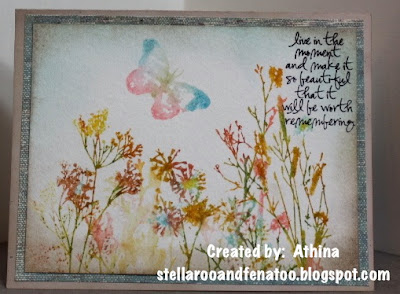
I have been playing some more with the techniques in the Creative Chemistry 101 online class.  I finally broke down and bought some of the Tim Holtz Distress Markers.  They are pretty fun to use.  I tried the watercolor technique with them and I think it turned out pretty well.

I first put a couple of Tim Holtz Visual Artistry stamps on an acrylic block.  I then just put some color down on the stamps with the markers.  Once I had the stamps colored, I spritzed them with water and stamped them on water color paper.  They blur a little bit, but that gives them the soft color.  I then heat set that set of images.  Then I thought I would try to spritz the same stamp with water again to see if I could get more color out of it.  Well, not a lot of color, but it filled in some of the areas "behind" the image.  Once I was satisfied with the flowers, I colored and stamped the butterfly using the same method.

To finish off the image, I used pumice stone and tumbled glass distress ink to ink the edges of the image. Pumice stone has now become my favorite color.  Then I stamped the sentiment from the same stamp set in the corner.  I fixed the image to a mat and put it on the card face.


For the inside, I used some more water color paper and just one of the images.  This image came out a little bit blurrier than the front, but I am ok with it.  I think it just looks soft.  I stamped the sentiment and ran some distress ink around the edges of the paper.  Then matted it to a background.


I hope you enjoyed this technique and will give it a try!

I would like to enter my card in the following challenges:
LEJ Designs - Fabulous Flowers
The Crafty Bloggers Network - Anything Goes
Dream Valley Challenges - Things with Wings
Stampin Sister in Christ - Use something new

Thank you for stopping by!

Blessings until next time!
Athina

Sunday, April 15, 2012

Happy Birthday Heather!

Hello out in Blog land,

Today we are celebrating Heather's birthday from my Crafty Gals blog group over at SCS.  She lives a bit up north and just had a little one about a month ago.  So I hope today she gets some time to rest and enjoy her birthday!

I thought this little image by Sassy Cheryl's was so cute and it has celebration all over it.  I colored it up with copics on cryogen paper.  It is inked around the edges with Tim Holtz distress ink, then matted on green cardstock.  The background paper is by MME. I topped it off with a few little flowers.  Who doesn't like to get flowers on their birthday?


inside sentiment by Print work creations

Copics used
Stop over to Heather's Blog, The Land of Stamping and wish her a Happy Birthday!

Have a great day Heather!

I would like to enter this into the following challenges:
Sassy Cheryl's Challenge #110 - Anything goes
CMC Challenge group - Use Yellow
Crafty Catz - Animal
Prairie Fairy Fridays - Anything goes
My Mums Craft Shop Challenges - It's a celebration
Rubys Rainbow - Birthday cake
Pinspirational Challenges - picture

Thanks for stopping by!
Until next time...
Athina

Tuesday, January 24, 2012

Happy Birthday Patty!

Good Morning!

Today is another very special day!! I belong to the Crafty Gals Blog Group over at SCS.  And it is Patty's Birthday today!  Please give Patty some extra Birthday wishes on her blog today!


 Her favorite color is purple.  I thought this High Hopes stamp TuTu was perfect for purple.  The outside sentiment is by Whimsy Stamps.  All paper is by My Mind's Eye, image colored on cryogen paper.  The outside eyelets were cut with the eyelet circle spellbinders die and embellished with pearls.  The sentiment was stamped with black memento ink and concord grape distress ink around the edges.  Then I put some white liquid pearls around the edges.


Copics used:
Skin:  E000, E00, E11, E13
Hair:  E50, E53, E55
Dress:  V01, V05, V06
Flower:  RV10, RV34, RV69, G20, G21, G24
Hearts:  RV34, RV69


The inside circle was cut with a eyelet circle spellbinders die.  The sentiment is by Amy R stamps.


Thanks for stopping by!  Make sure to wish Patty a very HAPPY BIRTHDAY!

Until next time...

Athina

Saturday, January 21, 2012

Happy Birthday Lela!

Good Morning!

Today is a very special day!! I belong to the Crafty Gals Blog Group over at SCS.  And it is Lela's Birthday today!  Please give Lela some extra Birthday wishes on her blog today!


I made this card for her based of a SCS sketch challenge.  Her favorite color is red and her favorite embellishment is buttons! The image is by Whipper Snapper.  Isn't he the cutest little clown?   He is colored on cryogen paper which has a great shimmer to it.

Here is the sketch!


Copics used:
Shoes:   YG93, YG95, YG97
Pants: Y32, Y35
Hat:  C3, C5, C7, 0
Shirt:  T1, R24, R27, R89, BG72
Skin:  E000, E00, E11, W1, W3, 0
Hair:  YR20, YR23, YR24
Flower:  BG11, BG72, BG75

The inside oval was cut with scalloped spellbinders die.  The sentiment is by Stampin Up.

Thanks for stopping by!  Make sure to wish Lela a very HAPPY BIRTHDAY!

Until next time...

Sunday, January 8, 2012

Sunday Sketch & Stamp Challenge #88

Good Evening!


I hope everyone had a great weekend.  I am determined to make this week the best after last week!  Lots going on and very busy after returning to work.  The short week felt longer than a normal 5 day work week. 

As one of my goals for 2012, I want to participate in more challenges to help me grow.  So I have been searching around.  I have done a few SCS challenges and posted in their gallery.  This will be my first blog challenge... Wish me luck!  So over at the Sunday Sketch & Stamp blog (here), I found this sketch for the January 8th challenge.


Perfect for me, as it is square and I have a love for square 5 1/4 cards.  So what did I create?


I used MME and Bo Bunny paper as the background.  The yellow paper that you can barely see, was actually white.  I used my wide Y15 copic marker to make it match Tilda's dress.  The image is Magnolia's Beautiful Tilda.  The sentiment is by Amy R stamps and is on a die cut by spellbinders.  I used mustard seed distress ink on the die cut and then some perfect pearls to give it that magical feel. 


Copics used:
Skin:  E000, E00, E11, E13, W1
Hair:  E35, E37, E57, E59
Frog:  YG01, YG03, YG17, YG25
Flowers:  R00, R21, R22
Dress:  Y02, Y04, Y06, Y15
Shading:  C1, C3, W1, W2, N1, W5

I also used some stickles around the wings and for some little texture bubbles around Tilda.


For the inside, I used the same paper as the front to bring it all together.  The inside sentiment is by America Art Stamp.  This card will go into my stash, as I don't have anyone in mind at this time.

I hope you have enjoyed your visit today.  Thank you for stopping by.  Have a great week!

Until next time....
Athina

Saturday, January 7, 2012

Longevity!

Hello in blog land!

Today we are celebrating my great aunt Florence's 90th Birthday!  I have to say my favorite thing about her is her strong hugs.  She is just a tiny little lady, but is still able to get around well.  She reminds me so much of my grandmother who passed a few years ago.

Here is just a quick picture of this beautiful lady!

I made this birthday card for her.  Very CAS, but I wanted to keep it simple for her.  I used some patterned paper and a little doily with a pearl brad to dress it up a bit.


We are looking forward to spending some time with family today and most importantly Florance.

Have a great weekend!
Thanks for stopping by!
Athina

Tuesday, November 15, 2011

Ele-Fun Birthday!

Hello Everyone!

Today has been a chilly and windy day!  I think fall has finally set in.  I have made a double diagonal fold card today.  My husband says that I should not make this style because things will get lost.  I beg to differ!  I think they are unique!

I found the idea over at SCS in the resources area.  Here is the link.
http://www.splitcoaststampers.com/resources/tutorials/diagonal_double_pocket_card/

 I choose cosmo cricket double sided paper in a fun theme for a birthday card.  The sentiment is by Stampin Up and the image is a High Hopes stamp, Ele-fun.  Isn't he the cutest little guy?  I would celebrate my birthday with him anytime!


The first pocket holds the High Hopes sentiment stamped on a die cut by Spellbinders.  I inked the edges in Tim Holtz distress ink and shifted the background layer a bit to add some contrast.  Finish it with some ribbon and a flower to match.

The second pocket holds a little envelope.  This is where my husband and I disagree.  My opinion is that this is a great place for a gift card.  He thinks no one will look at it and the card will go to waste.  Anyhow, the little envelope is covered with paper and a little Stampin Up sentiment finished off with ribbon colored with copic markers to match.

The little elephant is colored with copic markers and finished off with prisma pencils for extra shading.

Copics used:
Elephant:  C0, C1, C3, C5, R20, R21, R22
Hat/Cupcake Holder:   YR15, YR12, YR18
Cupcake:  Y02, Y04, Y06
Toe/Husk - W1, 0
Candle/Ball:  B91, B93, B95

Pocket # 2

Pocket 1


Thanks for looking!  I hope you enjoyed the card.  Your comments are much appreciated!
Have a great day!